Freshwater Shrimp with the new Gammarus Foil by Pro Sportfisher – Step By Step

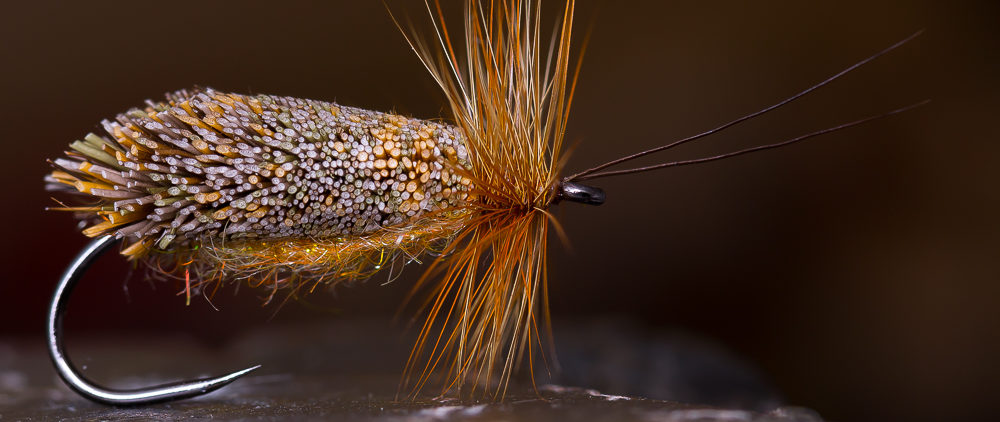
This is a really natural looking freshwater shrimp. Easy to tie and very durable. It’s tied with the new multi colored Gammarus Shrimp Back from Pro Sportfisher and Bug Bond.

You can get the Gammarus Shrimp Backs in different colors and sizes. Here, I used the brown color in small.

It was never easier to tie a super realistic pattern in such a short time. I believe, that it’ll catch fish from Finnland to Italy!


Materials:

  • Hook: Tiemco 2487 # 12
  • Weight: Lead Foil
  • Ribbing: Mono 0,14
  • Back: Pro Sportfisher Gammarus brown # small and Bug Bond UV Resin
  • Dubbing: SLF Squirrel Spikey Dubbing mixed with Hends Spectra Dubbing
  • Tail: CDC Feather
  • Thread: Dyneema


Take the hook, push down the barb and put it in your vise. Cut a stripe of lead out of the lead foil and create a nice lead body.


Take a CDC feather and cut off a „V“ from the tip. Tie the feather in as shown.


Take a shrimp back from the sheet and tie it in at the end. Tie also in the mono for the ribbing.


I used for this Gammarus a mix made out of Squirrel Dubbing and Spectra Dubbing. A natural color with a little bit of flash. Dub a not to slim body.


Fold the Gammarus foil to the front and catch it with you tying thread. Then, rib the body with the mono. Catch the mono, cut it off and finish the tying with a whip finish.


Now, take your Bug Bond and coat the back of the shrimp and cure it with the Bug Bond torch.


Pick out some beards and fibres with your dubbing needle to imitate the legs.


The finished shrimp, ready to fish.


The shrimp when wet. I don’t think, that a fish can resist.

Tight lines

Holger
Pro Tube Baitfish Step By Step

When I was a child, I got a big box full of LEGO. I loved to play with it for hours! Ok, my mom was often not so happy, because after playing, my room looked like after an explosion of a bomb. :-)

I still „play“ with a kind of LEGO today. Well, it’s more like a fly tying LEGO. I’m talking about the tube fly system from Morten Bundgaard, owner and chief creative of Pro Sportfisher. Like Lego, everything fits together perfectly. It’s just so fun to be creative and to find out, how much is possible.

For this step by step of the Pro Tube Baitfish, I used several products of Pro Sportfisher, especially the new Pro Raw Weights made out of tungsten and the brand new Pro Softheads, which are awesome. Perfect alternative to epoxy and uv resin for cool heads.

Materials:

  • Pro Flexitube clear
  • Pro Soft Sonic Disc clear
  • Pro Raw Weight
  • Pro Softhead
  • STS-Dubbing Fluo Flame
  • Ice Dub Pearl
  • Arctic Fox White
  • Pro Angelhair HD Pearl Green
  • Senyo’s Laser Dub White and Olive
  • 3D Eyes

Put the Pro Flexitube on the Pro Tubefly-Needle and do some turns with the thread. Split the thread and put some STS-Dubbing ind the gap and spin the bobbin. After twisting, give the dubbing a good brush with your velcro and wind it around.

Put a little bit of super glue on the thread and do some turns. Cut of the thread and put a clear Pro Soft Sonic Disc on the tube. In front of the disc, attach the thread to the tube again.

Take a bunch of fox and tie it in directly in front of the disc. Take some strands of Pro Angelhair HD and tie them in, too. At last, take another bunch of fox, slightly longer than the first bunch, spread it a little bit and tie it on top.

Split the thread again, put some ice dub pearl into the gap, spin the bobbin and brush the twisted dubbing. Wind the dubbing around, brush it again and put the Pro Raw Weight in front of the dubbing. This will give the tube a nice balance with a little bit jigging.

Take the white Laser Dub and tie it underneath the tube, then so the same with the olive Laser Dub on top. If you want, you can give the dubbing on top some dots or stripes by using a permanent marker.

Make a short whip finish and cut off the thread. Put the Pro Softhead on the tube and border the tip of the tube with your lighter. Just do a little drop of super glue into the recess and glue in some 3D-eyes of your liking. That’s it, you got a great baitfish tube! Just attach a single hook like the Owner Mosquito for example and you are ready to go!