Biot CDC Parachute

Turkey biots are very good for tying dry fly bodies. They swim really well.

I don’t discribe every tying step here, because they are the same (except the biot abdomen) as you have seen at the quill body CDC parachute tutorial.

Materials:

  • Hook: TMC 100 # 16
  • Tail: Micro Fibetts
  • Abdomen: Turkey Biot
  • Wing: CDC
  • Hackle: Whiting Genetic Dry Fly
  • Thorax: SLF Masterclass


tight lines

Holger Lachmann

Fast CDC Dun

A fast to tie mayfly dun pattern made out of CDC. It floats very well and is durable. I like to fish it in semi-fast running water. Micro fibetts, 2-4 CDC feathers (colour of your choice)  and a bit yarn, that’s all you need. I don’t know who invented this pattern, but I think it was Marc Petitjean.

Materials:

  • Hook: Maruto D04 BL # 12
  • Tail: Micro Fibetts
  • Abdomen: CDC Feather
  • Thorax and Wing: CDC Feather, Yarn


Tie in a loop of thread and 3 micro fibetts. Split the fibetts with the 2 piece of thread after cutting the loop.


Tie in a CDC feather with the tip first. Twist the feather and wind it around the shank. Then cut all little fibres, so that you’ve got a nice tapered CDC body.


Tie in a piece of yarn.


Preparing the CDC


Split the thread and put the prepared CDC in the gap. Then spin the bobbin to twist the CDC and the thread.


Wind the twisted CDC around the hook and pull it up with your fingers after every turn.


Seperate the the CDC with the yarn, to create the two main wings of the mayfly. Catch the yarn with the thread.


I like to fold the yarn back again, tie it in and cut it, so I make sure I’ve got a nice free hook eye.


A whip finish to secure the fly. Take your scissors…


…and cut the fly in shape. That’s it! If you tied some of them, you need less then 4-5 minutes to tie it.


Fish view


tight lines                                                                                                                         Holger Lachmann

Quill Body Parachute with CDC Wing

A superb all around mayfly pattern, which lies nicely flat and realistic on the water. Tie it in different sizes and colours to match the hatch. Personally I like to use CDC for the wing instead of polypropylen on the smaller sizes. It just looks more naturally.

Materials:

  • Hook: TMC 100 # 16
  • Tail: Micro Fibetts
  • Abdomen: Stripped Peacock Quill, UV-Resin
  • Wing: CDC
  • Hackle: Genetic Dry Fly Hackle
  • Thorax: SLF Masterclass Dubbing


Tie in a loop of tying thread and the end of the fly.


Tie in 3 micro fibetts, cut the thread loop and seperate the fibetts with the 2 pieces of thread.


Tie in a stripped peacock quill.


Tie in the tips of some CDC feathers as a wing.


Wind the peacock quill around the hook shank and catch it with the thread next to the wing.


Put a drop of tack free uv-resin on the quill body to secure it. Make sure, that there’s just a thin coat on the body.


Tie in the hackle as shown.


Dub the thorax.


Wind the hackle around the wing post and catch it with the thread underneath the hackle.


Cut of the hackle and do a whip finish underneath the hackle. A little drop of really thin varnish secures the whip finish. Ready to go!


View from below aka „the fish view“.


tight lines

Holger Lachmann

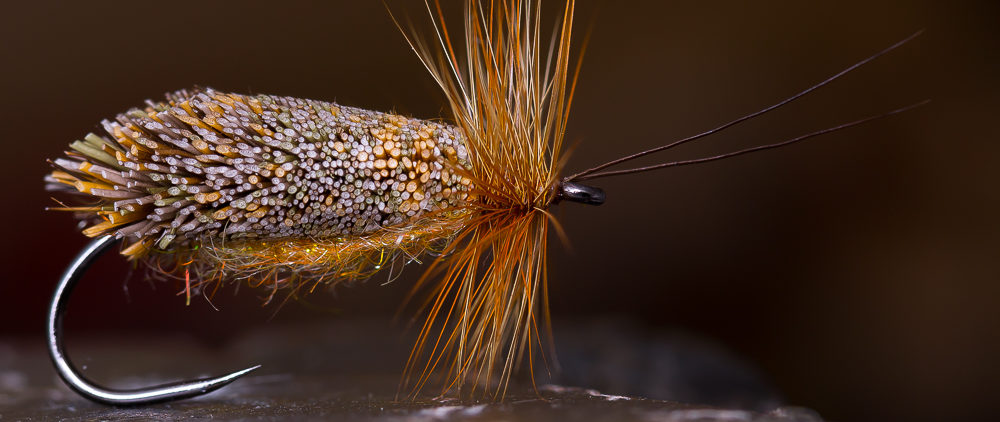
Extended Body CDC Caddis

When it’s getting dark on the river, the caddis often become very active. It’s really fun to fish a big caddis fly surfing over the surface. Sometimes the trouts go mad and take the fly very aggressively.

I don`t want to check all the time, if the fly is floating well. The fly should float like a piece of cork all night long. That`s why I like to use materials like CDC and foam for those kind of flies. If you want to treat the fly with fly floatant, you should use a highly fluid floatant like Water Shed. Very important, Water Shed must be completely dried before fishing.

Materials:

  • Hook: Maruto C47BL # 12
  • Extended Body: Foam
  • Wing: CDC and Moose Hock
  • Top: Pheasant
  • Body and Legs: CDC
  • Antennae: Moos Hock


Put a needle in your vise and tie a layer of thread. Very important: Use NOT a waxed thread. If you do, you may get problems pushing the finished body from the needle.


Put a 3 mm wide strip of foam on the needle.


Create some nice segements with your thread. If you got problems creating the body, just google „extended foam body“. There you find some nice videos.


Finish the body behind the last segment with a whip finish.


Pull the extended body from the needle and tie it in.


With a permanent marker you can give the body a nice colour.


As a wing, tie in three CDC feathers. They should be longer than the body.


Over the CDC wing, you should tie in some moos hock hair in the same length like the CDC. It push the CDC down, so the wing is always flat over the body and it increases the floatability. Then tie in some fibres from a pheasant tail. Split the thread, put in some CDC and twist the the thread by rotating the bobbin. I like to work with the Petitjean Magic Tool when preparing the CDC.


If necessary, repeat spinning the CDC and wind it around a second time.


Fot the antennae I used two hair of moose hock.


Pull the pheasant fibres foreward and catch it with the thread.


Spinn some CDC as dubbing around the thread and create a little head, then fold the pheasant fibres back, cut it and whip finish the fly.


To secure the thread and the pheasant use a bit of varnish or really thin uv-resin, which makes the fly very durable.


Finished fly from underneath, or „the fish view“. ;-)

tight lines

Holger Lachmann