Poxy-Fox

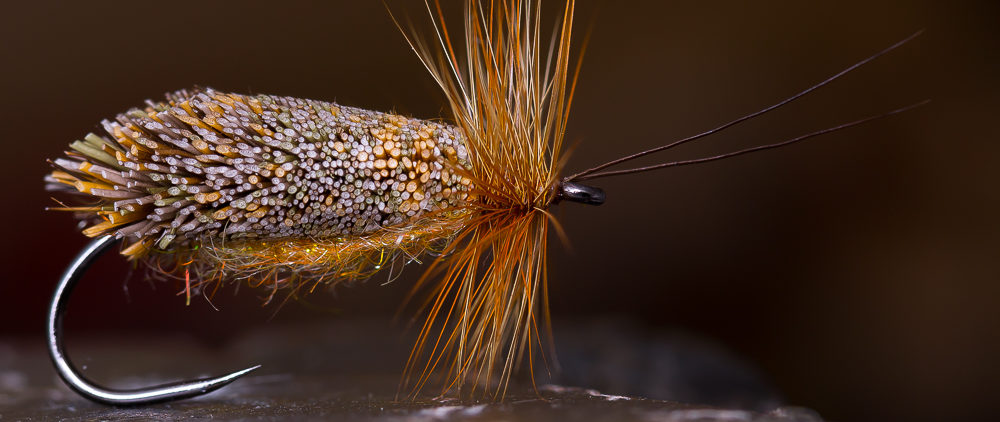
When I first tied this pattern, I used epoxy for it. That’s why there’s „Poxy“ in the name of the fly. Today I use uv-resin for it, but I didn’t wanted to chance the name. ;-)

When you tie this pattern, it’s very important, that the resin soaks into the braid at the end of the fly to fix the marble fox, so it won’t tangle around the hook bend while casting. The materials used are:

  • Gamakatsu F314 # 2
  • Mono thread
  • 3D Eyes
  • Marble Fox olive
  • Krinkle Mirror Flash
  • Ice Dub golden olive
  • Felix Cord olive
  • Permanent Markers
  • UV-Resin

You can also tie in some lead wire if you want, to create a jigging effect for example.

The Poxy-Fox looks really massive on the picture, but in the water it got some translucency. That’s the reason, why you should dub a thin body before slipping the flexi cord around the hook shank.

tight lines

Holger Lachmann
Fleye Foil Fox Candy – Step By Step

Here’s a Surf Candy style pattern tied with the new Fleye Foils by Bob Popovics. The tail made out of arctic fox wiggles nice in the water. Much better than most synthetics. It’s not just a battern for the saltwater fisherman, you can also fish it in freshwater. Small sizes for trout and char for example, bigger ones for asp. Just give it a try.

Materials:

  • Hook: Gamakatsu SS15/T # 4
  • Thread: Mono
  • Tail: Arctic Fox
  • Flash: Krinkle Mirror Flash Pearl
  • Body: Senyo’s Laser Dub, Bob Popovics‘ Fleye Foils „Silverside“ and uv-resin


Tie in the arctic fox as tail and 3 strands of krinkle mirror flash, one on each side and one on top.


3mm in front of the fox, tie in a bunch of white senyo’s laser dub on the top of the hook shank and one underneath.


Do the same with a bunch of laser dub holographic minnow belly 3 mm infront of the white dub.

Now, pick two colors of laser dub of your liking, here it’s light olive and shrimp pink, and tie it in like you see above.

Pull the laser dub backwards, that’s how you put a bit of volume to the head, otherwise it won’t fit to the shape of the foil.

Put a foil on each side. Just tie in the little „nose“ of the foil with a couple of turns and whip finish the fly.

Pull the laser dub and the foils backwards and start to apply the uv resin on the body. The resin should soak into the dubbing, that gives the fly later some translucency. Mostly it’s easier to applicate two layers of uv resin. You got much more control of everything.

If you don’t use a tackfree uv resin, put a thin coating of nail varnish on the uv resin to get a tackfree glossy finish.

That’s it! Ready for fishing!

tl

Holger Lachmann

A closer look at: Bob Popovics‘ Fleye Foils

Lutz Schepers from www.theflypeople.com asked me some weeks ago, if I wanted to test the new Fleye Foils by Bob Popovics. I always liked the flies and ideas of Bob Popovics, so I surely wanted to test his newest idea. The foils imitate the eyes, the gills, the silver belly and flanks on one side of the fly with just one simple tying step.

I don’t know the reason why, but when I got the foils, I didn’t felt the inner drive to test them immediately. Maybe I didn’t wanted to do the normal Sury Candy with it.

This morning, I did the first tests with the smallest „Bay Anchovy“ foils. The fly you see below is the first try. It’s a really simple fly made out of a hook, mono thread, different colors of Senyo’s Laser Dub, Fleye Foils and uv resin. It doesn’t look to shabby for a first try, I think.

The Fleye Foils are easy to use. You just have to tie in the „nose“ next to the hook eye and push the sticky backsides of the foils against the flanks of the fly. One or two coatings of uv resin and you are done.

After tying some patterns with Fleye Foils, I have to say, that if you want to make Surf Candy-style flies as fast and easy as possible, the foils are an enrichment. The only thing I would suggest to improve is, to give more expression to the eyes.

tl Holger Lachmann