Winged Ant Step By Step

993543_789255984455102_6757422374577850756_n

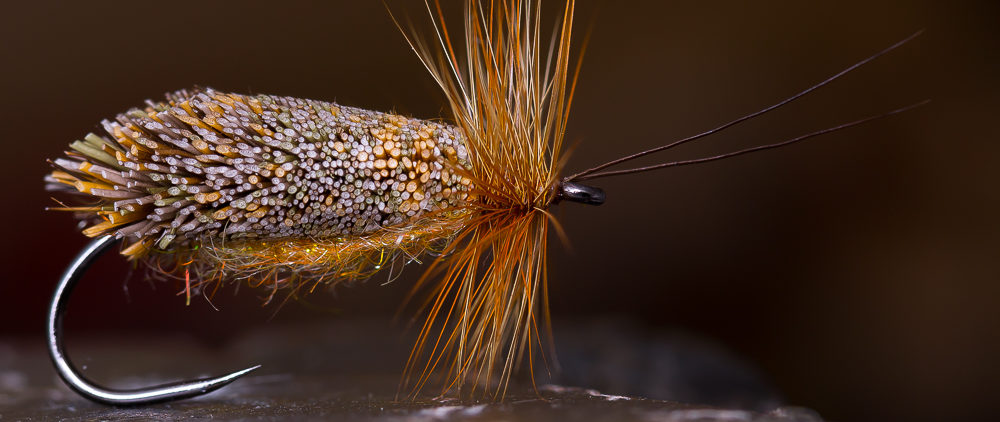
Ants are everywhere, especially in the summer, when the winged ants are flying around. Fish love to eat them, so it’s logical to have some ants in your fly box. This is an easy to tie pattern and with a little bit floatant, it swims very well. I tied here a version with some foam as underbody, coated with uv resin. It’s for the faster flowing water. I tie another version with the two segments completly made with uv resin without any foam. The secound version sits deeper in the surface film, which looks more natural in slow water, where the fish got more time to take a closer look. The shape of the hook is not so important, as long as the hook gap is big enough.

IMG_5504-1

Materials:

  • Hook: Dry fly hook # 12-16
  • Body: Foam coated wit Bug Bond UV Resin and colored with a black Marker Pen
  • Hackle: Whiting black
  • Wings: Flash Dubbing

IMG_5530-1

Tie in the foam and fold it to the front and tie it down.

Do the same for the front segment and color it with a marker pen.

Take some Bug Bond Original and cover both segments with the resin and harden it with your BB torch.

Take some strands of flash dubbing and tie it in just before the first segment. It should be tied in V-shaped, so it looks like wings.

Tie in a black hackle and wind it in three turns to the front and catch it with your thread and do a whip finish.

The result. A nice little ant fly ready for the fish.
Stickleback Zonker – Fly Tying Tutorial

I made a new little video about an easy to tie pattern of a Stickleback.

[vimeo width=“600″ height=“500″]https://vimeo.com/108999238[/vimeo]

Seatrout Fly „Food“ Video Tutorial

I made last night a video tutorial of a seatrout pattern for the Baltic Sea. I just called it „Food“, because maybe the seatrouts think it’s a little fish or a shrimp….just food.

Unfortunately Vineo reduced the quality of the video. I’ll have to work on this.

Anyway, I hope you’ll like it. I think I will do some more videos in the future. Maybe you tell me, what you think about it.

[vimeo width=“600″ height=“500″]https://vimeo.com/108696581[/vimeo]

Caramel Shrimp Step By Step Video

This is the first time I made a video of the single steps to tie the fly. I hope you like it. The fly is a very good and looks even better in the water. Great pattern for Seatrout.

[vimeo width=“600″ height=“400″]http://vimeo.com/108574605[/vimeo]


THE BURNER – A Step By Step Tutorial

IMG_4343 (Medium)

This is a very durable and effective streamer pattern to imitate a small fish. It’s absolute versatile. Seatrout, trout, perch, asp, zander, … every fish which hunts for smaller fish is a good target for THE BURNER.

It looks good when dry, but it looks amazing when wet.

This is really a pattern which you should try.

10406610_687009264679775_3137163024730155967_n

Materials:

  • Hook: Tiemco 811 S #4
  • Weight: Lead Wire
  • Ribbing: 0,25mm Mono
  • Body: UV Ice Dub Olive Brown
  • Back: Zonker Stripe
  • Front: Different colors of Senyo’s Laser Dub
  • Head: 3 D Eyes and Bug Bond Lite to secure it


IMG_4330 (Medium)

IMG_4331 (Medium)

Wind on the lead wire and attach the mono for the ribbing

IMG_4332 (Medium)

IMG_4333 (Medium)

IMG_4335 (Medium)

Split the thread and put the Ice Dub between it. Spin the thread and brush the dubbing with your velcro, than wind the dubbing from the back to the front. Brush the body again with your velcro.

IMG_4336 (Medium)

IMG_4338 (Medium)

Tie in a piece of a zonker stripe and rib it with the mono. Catch the mono at the front with your thread.

IMG_4339 (Medium)

IMG_4341 (Medium)

Tie in some bunches of Senyo’s Laser Dub in the colors of your liking. The belly should always be brighter than the back. Finish with a whio finish behind the hook eye and comb the fibres back.

IMG_4342 (Medium)

IMG_4345 (Medium)

IMG_4348 (Medium)

IMG_4343 (Medium)

Take your super glue and put two 3D eyes on each side. Then take Bug Bond Lite UV Resin and put a drop between the eyes on the top and on the underside. The thin resin soaks into the head. Use your Bug Bond torch to harden the resin. If you like, you can do some gills behind the eyes with a thin marker pen.

That’s it! A sweet baitfish pattern with the great movement of the zonker stripe and the cool translucent look of the laser dub.

Tight lines and some good time at the water!

Baithfish Quintett From Zero To Hero

IMG_4303 (Large)

Caddis Pupa with tungsten head – step by step

This is a good all around nymph to imitate caddis pupa. The vague looking nymph seems eatable to the fish. It’s a nice combination of a semi-transparent body and the mix of cdc, soft fibres and the dubbing mix of natural hare’s ear and ice dub. Not to flashy. Just that kind of nymph I personally like to fish.

The tying steps are self-explanatory, I guess. So here are just the materials.

If you got questions, just feel free to ask.


  • Hook: Tiemco 2488 #12
  • Weight: Tungsten bead
  • Body: greenish-yellow strands of a present bag, Polish Quill olive, Bug Bond Lite
  • Wing: CDC Puff from Troutline
  • Legs: Fibres of a Hen Hackle
  • Thorax: Dubbing Mix Hare’s Ear and Ice Dub, secured with Bug Bond Lite


IMG_4230 (Large)

Quick Baitfish Streamer Step By Step For Asp, Trout, Perch, Zander, …

This is a really quick step by step of a good baitfish pattern. Ok, to be honest, I just tied this fly for my fishing and took a quick shot from time to time. ;-)

This baitfish looks ok when dry, but when it’s wet! Holy cow! It looks amazing! The Senyo Laser Dubbing gets semi-tranparent and there is a cool flash in the fly, too. The tail made out of arctic fox just moves fantastic in the water. One important fact is, that you have to stiffen the first 5 mm of the tail with Bug Bond Lite. So, the tail doesn’t tangle around the hook bend during the cast. Most flies with a really soft tail material behave like that and it is really a pain in the ass, when you strip your fly in and you see almost every cast, that it was tangled. When you put some weight in the front like lead wire or a tungsten bead, you get a nice jigging effect. Just give this fly a try. It’s durable, it’s tied very fast and it catches fish.

IMG_4142 (Large)

Tube Fly Tying

My cam was lying next to me on my tying table and I made some quick pictures during tying. Just for fun. This is not really a step by step tutorial…


Sedge Pupa Step By Step Tutorial

I posted this pattern some weeks ago on my blog and on Facebook and I was asked, if I could do a step by step tutorial about it. So, here it is. I hope you like it as much as I do.


Materials:

  • Hook: Maruto C47 BL # 12
  • Weight: Tungsten Bead Black Nickel
  • Thread: Dyneema
  • Body: Thread-Underbody, olive marker pen,  Flashabou, Polish Quills green
  • Resin: Bug Bond Lite
  • Dubbing: SLF light olive and cinnamon
  • Wings: Flashabou Mirage colored with a brown marker pen
  • Wing Case: Pheasant
  • Legs: Partridge

Put the hook with the tungsten bead in the vise.


Form the unterbody with your thread and tie in the Flashabou and Polish Quill.


Color the underbody with an olive marker pen and wind the Flashabou and then the Polish Quill around the body and secure it with your tying thread.


Put some Bug Bond Lite on the body and cure the resin with your Bug Bond torch. Then, tie in some strands from a pheasant tail feather as shown.


Dub some SLF light olive on the fly and tie in the brown colored Flashabou Mirage. Cut the Mirage like shown on the photo.


Dub the rest with SLF in cinnamon till you reach the tungsten bead.


Cut a „V“ out of  a partridge feather and tie in the fibres of the partridge as legs. Then fold the pheasant strands to the front to create the wing case and catch it with your tying thread. Put a drop of Bug Bond Lite on the wing case incl. the thread with which you catch the pheasant. Cure the Bug Bond Lite with your Bug Bond torch and cut the thread. You’re done! The Bug Bond Lite makes it super strong! You don’t need to do whip finish!


That’s it! Now grab your fly rod and catch some nice trout or grayling or whatever you like to catch with nymphs and pupas!

tight lines!

Holger

Laser Eel – Step By Step

I love to fish and tie sandeel patterns for sea trout in the Baltic Sea (a friend also caught Stripers and False Albacore with it very well btw).

My „Baltic Candy„, a variation of Bob Popovics famous Surf Candy, is after some years in use quite well known among the coastal fishermen, which makes me pretty happy and proud, to be honest.

This Laser Eel is another variation, which is quite easy to tie, maybe easier than the original Baltic Candy. The only difficulty is the use of uv resin on/in the Laser Dubbing, but there is no extra weight used, so the body becomes easily slick.

Just give this fly a try, it looks even better in the water. ;-)

Materials:

  • Hook: Gamakatsu SC 15 # 1
  • Thread: Mono
  • Tail: Polar Fibre white and olive
  • Flash: Angel Hair Holographic Silver
  • Inner Body: Laser Flash Rainbow
  • Body: Senyo’s Laser Dub white and olive
  • Eyes: 3D-Eyes yellow 3mm
  • UV Resin: Bug Bond

Place the hook in the vise, tie in a piece of polar fibre in white, then a couple of strands of angelhair and another piece of polar fibre, this time in olive. It’s very important to comb the material carefully.

Wind some strands of the laser Flash rainbow around the hook shank and catch it with your thread.

Tie in a bunch of Senyo’s Laser Dub on top and underneath the hook shank and comb it backwards. Bring the thread to the hook eye and do a whip finish. Put the eyes on right place on both sides.

Put some Bug Bond on the head and let it soak into the Laser Dubbing. Cure it with your Bug Bond uv torch.

Apply another coating of Bug Bond to make the head nice and slick.

That’s it! The finished fly, very durable and fishy! Hopefully it brings a nice bend in your rod!


Freshwater Shrimp with the new Gammarus Foil by Pro Sportfisher – Step By Step

This is a really natural looking freshwater shrimp. Easy to tie and very durable. It’s tied with the new multi colored Gammarus Shrimp Back from Pro Sportfisher and Bug Bond.

You can get the Gammarus Shrimp Backs in different colors and sizes. Here, I used the brown color in small.

It was never easier to tie a super realistic pattern in such a short time. I believe, that it’ll catch fish from Finnland to Italy!


Materials:

  • Hook: Tiemco 2487 # 12
  • Weight: Lead Foil
  • Ribbing: Mono 0,14
  • Back: Pro Sportfisher Gammarus brown # small and Bug Bond UV Resin
  • Dubbing: SLF Squirrel Spikey Dubbing mixed with Hends Spectra Dubbing
  • Tail: CDC Feather
  • Thread: Dyneema


Take the hook, push down the barb and put it in your vise. Cut a stripe of lead out of the lead foil and create a nice lead body.


Take a CDC feather and cut off a „V“ from the tip. Tie the feather in as shown.


Take a shrimp back from the sheet and tie it in at the end. Tie also in the mono for the ribbing.


I used for this Gammarus a mix made out of Squirrel Dubbing and Spectra Dubbing. A natural color with a little bit of flash. Dub a not to slim body.


Fold the Gammarus foil to the front and catch it with you tying thread. Then, rib the body with the mono. Catch the mono, cut it off and finish the tying with a whip finish.


Now, take your Bug Bond and coat the back of the shrimp and cure it with the Bug Bond torch.


Pick out some beards and fibres with your dubbing needle to imitate the legs.


The finished shrimp, ready to fish.


The shrimp when wet. I don’t think, that a fish can resist.

Tight lines

Holger

Bad Ass Bass Banger – Step By Step

The Bad Ass Bass Banger – A streamer perfect for bass/perch and zander/walleye. It has a great action under water, because of the excellent moving tail, the jigging and the massiv front collar, which pushes a lot of water. It’s easy and fast to tie, durable and just a great fishing fly. The jigging can be controled by the weight of the brass dumbells.

Materials:

  • Hook: Gamakatsu F 314 # 4
  • Thread: Dyneema white and UTC fluo green
  • Dubbing: Ice Dubbing Chartreuse
  • Tail/Body: Tiger Barred Rabbit Stripes
  • Front Collar: Tiger Barred Rabbit Stripes
  • Head: Brass Dumbells with Eyes, Senyo’s Laser Dub fluo chartreuse + green/ chartruese, Bug Bond
  • Flash: Krinkle Mirror Flash


Put the hook in the vise, wind a good basement of thread and tie in the dumbell eyes. Use super glue during the tying, so the dumbells won’t slip around the hook shank during fishing.


Splitt the thread or make a dubbing loop, but the ice dubbing in the gap and twist it, then brush ist with your velcro-brush and wind it from the back to the front behind the dumbells. Then brush the dubbing body again.

Jab the hook through the leather of the rabbit stripe and tie the stripe right behind the dumbells down. Secure the punctured stripe with a little drop of super glue.


Bad Ass Bass Banger (15) (Mittel)

Tie in the krinkle mirror flash an each side. I prefer to use two or more different colors of flash. Split the thread again and put some rabbit stripe in a material clamp and cut away the leather. Put the rabbit stripe hair into the thread gap and twist the thread, then wind it around the hook next to the dumbells.


Bad Ass Bass Banger (17) (Mittel)

Change the thread and tie in the laser dub like shown on the pictures above on top and on the underside. The lighter color always belong to the underside.


Finish with a nice massive thread-head, which pushes the senyo back.


Push the senyo dubbing on the underside to the back and apply the Bug Bond on the underside and on the head.

Ready to fish! Wish you a lot of fun with the Bad Ass Bass Banger!

tl

Holger Lachmann