Captain FuzzyBug’s ready for a new mission

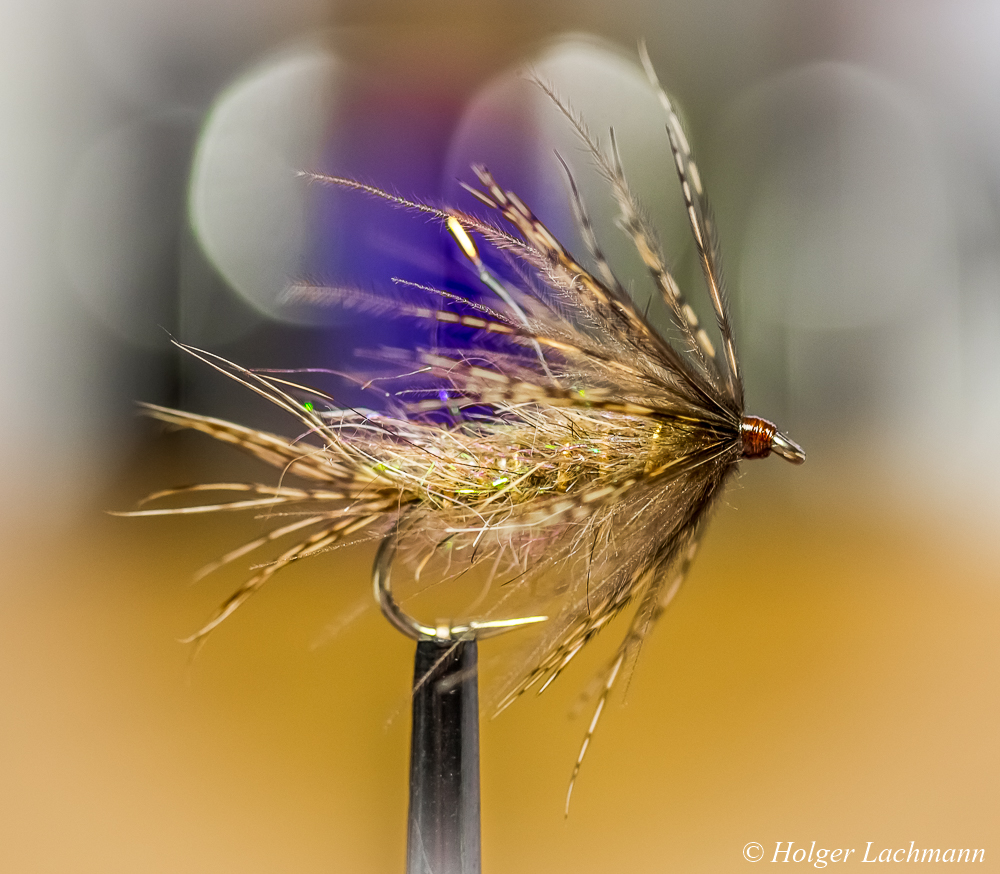
Is it a wetfly? Is it a nymph? Is it a flymph? – It’s CAPTAIN FUZZYBUG!

IMG_5930-1

Sometimes trout like flies, which are presented actively. That happend to me the last time at the river. Dead drift was not what they liked. The „Leisenring Lift“ brought fish and wet fly swing with a little bit shaking.

Normal wetflies often fish to high in the water, especially in spring, when the water is still very cold and the fish are not willing to rise. CAPTAIN FUZZYBUG is weighted and swings deeper in the water column.

The mix of partridge, hare’s ear, ice dub, tinsel and CDC gives this fly the fuzziness and the trouts the illusion of something eatable. It’s a „in case of“-fly which produces takes even if the normal patterns won’t work.

It’s also not complicated to tie, so tie 3-4 and put them in your fly box. You’ll never know when you’ll need the help of CAPTAIN FUZZYBUG! ;-)

Wet Fly „Struppi“

I’m not a wet fly guy. If I remember right, I fished wet flies less than 10 times in more than 20 years of fly fishing. I don’t know why, but it was not „my style“. I prefered more natural looking patterns like CDC dries, nymphs and emerger. I know, that wet flies are catching a lot of fish and some also imitate insects like stillborns or drowning duns, but…. I just don’t like to fish them. That’s also the reason, why I don’t have much experience in tying wet flies. I tied less than 12 classical wet flies in my life.

This year I’ll promised myself to give them more often a chance. That means, that I have also to learn to tie them. Most important, I have to know the materials, especially the feathers for the wings and how they react, when you tie them in.

„Struppi“ is one of the first wet flies. It’s kind a freestyle march brown. It’s not a „pretty“ fly, but looks very fishy. I mixed a little bit of Ice Dub into the Hare’s Ear Dubbing and so there are some light reflexes in the body. I ribbed it with mono and the tail and the front hackle is made from partridge. For the wing, I’ve used mottled turkey. As hook I choosed a Kamasan B 405 # 12.

2015-01-10 21.24.41-1

Struppi


Orange Struppi

Orange Struppi

Yellow Struppi


X-Mas flies

Used some quiet hours for some tying of nymphs for my fishing in the next year.

Materials:

  • Maruto C47 BL #14
  • Small tungsten beads in copper and black nickel
  • Coq de Leon for the tails
  • Copper wire and mono for the ribbing
  • Pheasant for the abdomen
  • Peacock dubbing brown for the thorax
  • Pheasant for the wing case
  • Partridge for the legs
  • Bug Bond Lite to secure the wing case and the thread

10882193_766968466683854_5850000047819133612_n

Bread and Butter

IMG_5051-1

Good things are often very simple. Like these small nymphs tied on a short shank hook. The body length without the bead is 5mm. Even this are small nymphs, the hook gap is pretty big, so the hooking quality is still good. You can fish the nymphs very deep and you don’t have to be afraid of loosing them, because if you do so, you can tie some new ones in a short time.

Sedge Pupa Step By Step Tutorial

I posted this pattern some weeks ago on my blog and on Facebook and I was asked, if I could do a step by step tutorial about it. So, here it is. I hope you like it as much as I do.


Materials:

  • Hook: Maruto C47 BL # 12
  • Weight: Tungsten Bead Black Nickel
  • Thread: Dyneema
  • Body: Thread-Underbody, olive marker pen,  Flashabou, Polish Quills green
  • Resin: Bug Bond Lite
  • Dubbing: SLF light olive and cinnamon
  • Wings: Flashabou Mirage colored with a brown marker pen
  • Wing Case: Pheasant
  • Legs: Partridge

Put the hook with the tungsten bead in the vise.


Form the unterbody with your thread and tie in the Flashabou and Polish Quill.


Color the underbody with an olive marker pen and wind the Flashabou and then the Polish Quill around the body and secure it with your tying thread.


Put some Bug Bond Lite on the body and cure the resin with your Bug Bond torch. Then, tie in some strands from a pheasant tail feather as shown.


Dub some SLF light olive on the fly and tie in the brown colored Flashabou Mirage. Cut the Mirage like shown on the photo.


Dub the rest with SLF in cinnamon till you reach the tungsten bead.


Cut a „V“ out of  a partridge feather and tie in the fibres of the partridge as legs. Then fold the pheasant strands to the front to create the wing case and catch it with your tying thread. Put a drop of Bug Bond Lite on the wing case incl. the thread with which you catch the pheasant. Cure the Bug Bond Lite with your Bug Bond torch and cut the thread. You’re done! The Bug Bond Lite makes it super strong! You don’t need to do whip finish!


That’s it! Now grab your fly rod and catch some nice trout or grayling or whatever you like to catch with nymphs and pupas!

tight lines!

Holger

Hangover Fly – The First Fly Of 2014

01.01.2014

The first fly of the year, the Hangover Fly. A nymph # 14 with a tungsten Bead.

….big is beautiful…

After tying some flies for grayling in size 18 & 20 I decided to tie two pike flies on Partridge Predator hooks size 4/0 as an equalization….one very colorful, the other one in muted colors….

Tied mainly with rabbit stripes and arctic fox.


Quill Body CDC Emerger No. 2 – Step By Step

It’s the end of April and the trout and grayling season will start soon.

Here’s another very good emerger pattern, which imitates some different may fly species, depending on the colour and size. It’s tied on the new Daiichi 1167 Klinkhamer hook, designed by the famous dutch fly tyer Hans van Klinken.

The Daiichi 1167 got a stronger wire compared to the Tiemco 212Y for example, which makes sure, that the abdomen hangs deep in the surface. That’s really important and that’s the reason, why this pattern got no tail or a trailing shuck, to make sure, that the abdomen is hanging deep in the surface.

The quill body is covered with a thin coating UV Resin.


Materials:

  • Hook: Daiichi 1167 # 14
  • Abdomen: Polish Quills &Tack Free UV Resin
  • Thorax: Oliver Edwards Master Class Dubbing
  • Wing case: CDC
  • Wing: CDC
  • Legs: Partridge


Put the hook into the vise, do a layer of thread and tie in a stripped peacock quill. Wind the quill around the hook shank and catch it with the tying thread.


Put a little drop of Tack Free UV Resin on the stripped peacock quill and spread it on the abdomen. Cure it with your UV torch.


Tie in two CDC feathers for the wing case. Then tie in the tip of another white CDC feather as a crippled wing.


Dub the body and tie in some partridge fibres to imitate the legs. Fold each CDC feather to the hook eye and catch it with the tying thread. The CDC wing should be exactly in the middle of the feathers.


Cut the CDC feathers for the wing case and do some turns with your whip finisher to create a little head. Varnish the head, if you like. That’s it, ready for fishing. ;-)

tight lines

Holger Lachmann