If the worms are hatching in the Baltic Sea in the spring and the Seatrouts go crazy, you must have a worm pattern.
Schlagwort-Archive: Flash
Tube Fly Tying
Nano Tube
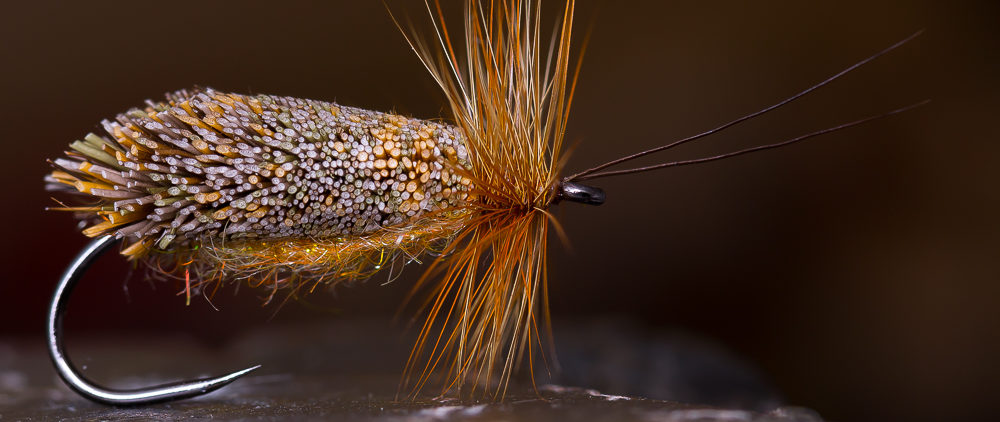
Sedge Pupa Step By Step Tutorial
I posted this pattern some weeks ago on my blog and on Facebook and I was asked, if I could do a step by step tutorial about it. So, here it is. I hope you like it as much as I do.
Materials:
- Hook: Maruto C47 BL # 12
- Weight: Tungsten Bead Black Nickel
- Thread: Dyneema
- Body: Thread-Underbody, olive marker pen, Flashabou, Polish Quills green
- Resin: Bug Bond Lite
- Dubbing: SLF light olive and cinnamon
- Wings: Flashabou Mirage colored with a brown marker pen
- Wing Case: Pheasant
- Legs: Partridge
Put the hook with the tungsten bead in the vise.
Form the unterbody with your thread and tie in the Flashabou and Polish Quill.
Color the underbody with an olive marker pen and wind the Flashabou and then the Polish Quill around the body and secure it with your tying thread.
Put some Bug Bond Lite on the body and cure the resin with your Bug Bond torch. Then, tie in some strands from a pheasant tail feather as shown.
Dub some SLF light olive on the fly and tie in the brown colored Flashabou Mirage. Cut the Mirage like shown on the photo.
Dub the rest with SLF in cinnamon till you reach the tungsten bead.
Cut a „V“ out of a partridge feather and tie in the fibres of the partridge as legs. Then fold the pheasant strands to the front to create the wing case and catch it with your tying thread. Put a drop of Bug Bond Lite on the wing case incl. the thread with which you catch the pheasant. Cure the Bug Bond Lite with your Bug Bond torch and cut the thread. You’re done! The Bug Bond Lite makes it super strong! You don’t need to do whip finish!
That’s it! Now grab your fly rod and catch some nice trout or grayling or whatever you like to catch with nymphs and pupas!
tight lines!
Holger
Czech Nymphs
To be honest, I’m not a fan of czech nymphing. I just love to cast with a flyrod. Czech nymphing is super effectiv, no doubt about that. It’s just too less casting for my liking… ;-)
The Czech Nymphs on the other hand are pretty cool flies. I didn’t fish them much in the past, but I want to try them in the next season, especially the ones with a little hot spot. This is quite hard for me, because I got a lot more faith in natural colors. Maybe I was wrong all the time, we’ll see….
Czech Nymphs should be weighted AND as slim as possible to sink fast. That’s not the easiest task. You have to find the right amount of dubbing. Less is more!
I look forward testing them in a nice stream for trout and grayling. :-)
Hangover Fly – The First Fly Of 2014
Spey = Shrimps
I just love spey hackles to tie shrimp patterns.
You can find the tutorial here https://theonefly.com/?p=535
Some Poor Man’s Pattegrisen
A very good seatrout pattern. It’s a little bit easier and cheaper then the original Pattegrisen by Claus Eriksen. I’ve made a step by step some time ago, have a look here https://theonefly.com/?p=535
Have fun! :-)
Flash Tube
School of Laser Eels
and two more pike tubes
Flash Tubes For Pike
Quick flash tube
Sandeels
Laser Eel – Step By Step
 I love to fish and tie sandeel patterns for sea trout in the Baltic Sea (a friend also caught Stripers and False Albacore with it very well btw).
My „Baltic Candy„, a variation of Bob Popovics famous Surf Candy, is after some years in use quite well known among the coastal fishermen, which makes me pretty happy and proud, to be honest.
This Laser Eel is another variation, which is quite easy to tie, maybe easier than the original Baltic Candy. The only difficulty is the use of uv resin on/in the Laser Dubbing, but there is no extra weight used, so the body becomes easily slick.
Just give this fly a try, it looks even better in the water. ;-)
Materials:
- Hook: Gamakatsu SC 15 # 1
- Thread: Mono
- Tail: Polar Fibre white and olive
- Flash: Angel Hair Holographic Silver
- Inner Body: Laser Flash Rainbow
- Body: Senyo’s Laser Dub white and olive
- Eyes: 3D-Eyes yellow 3mm
- UV Resin: Bug Bond
Place the hook in the vise, tie in a piece of polar fibre in white, then a couple of strands of angelhair and another piece of polar fibre, this time in olive. It’s very important to comb the material carefully.
Wind some strands of the laser Flash rainbow around the hook shank and catch it with your thread.
Tie in a bunch of Senyo’s Laser Dub on top and underneath the hook shank and comb it backwards. Bring the thread to the hook eye and do a whip finish. Put the eyes on right place on both sides.
Put some Bug Bond on the head and let it soak into the Laser Dubbing. Cure it with your Bug Bond uv torch.
Apply another coating of Bug Bond to make the head nice and slick.
That’s it! The finished fly, very durable and fishy! Hopefully it brings a nice bend in your rod!


